Metal shank buttons are a popular choice for various sewing projects, thanks to their durability and ability to add a touch of elegance to garments. Unlike flat buttons, metal shank buttons feature a raised hole, or shank, that allows the button to sit above the fabric, creating a distinctive look. Installing these buttons may seem daunting at first, but with the right tools and techniques, you can easily achieve professional results. This comprehensive overview will guide you through the entire process of installing metal shank buttons.
Before diving into the installation process, it's essential to gather all the necessary materials. Here’s a quick list to help you prepare:
Once you have all your materials ready, you can start preparing your fabric. Take the following steps:
With your preparations complete, you can now install the metal shank button:
After installing your metal shank button, it’s essential to check its stability and appearance. Here are a few tips to ensure everything looks great:
With practice, installing metal shank buttons will become a breeze, enhancing both your sewing skills and your projects. Whether you’re adding a stylish element to a garment or reinforcing functionality in outerwear, following these steps will help you achieve a polished finish every time.
Installing metal shank buttons can elevate your sewing projects, adding a touch of elegance and functionality. However, before diving into the installation process, certain key factors need to be considered. This guide will walk you through essential prerequisites to ensure a smooth installation experience.
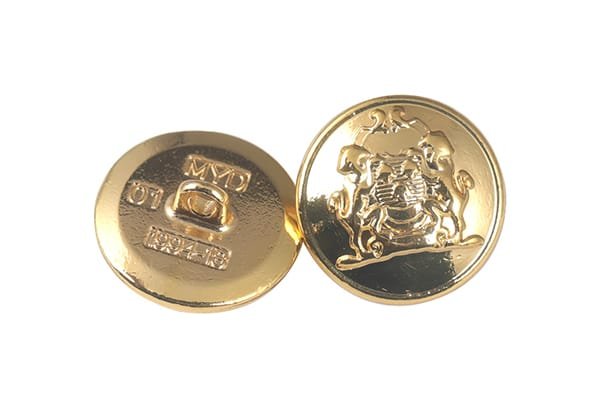
Metal shank buttons differ from traditional buttons in design and functionality. They feature a raised shank or stem that allows for easy fastening and provides added durability. Here are some important points to understand:
Before installing metal shank buttons, it’s essential to gather all necessary supplies. This not only makes the process smoother but also ensures that you have everything you need at your fingertips. Here's a list of supplies you'll want to have ready:
Placement is crucial when installing metal shank buttons. Incorrect positioning can lead to uneven tension or functionality problems. Here are some tips for choosing the right location:
For optimal results, understanding how to create buttonholes is essential. Metal shank buttons often require specific buttonhole techniques. Here are key considerations:
Taking the time to understand these elements before starting the installation will save you time and potential frustration. When approached thoughtfully, installing metal shank buttons can be a rewarding addition to your sewing repertoire. Armed with the right knowledge and tools, you can enhance both the durability and appearance of your garments, ensuring a polished final product. Once you've prepared adequately, you’ll find the process straightforward and enjoyable, allowing your creativity to shine through each project.
Metal shank buttons are a popular choice for both functional and decorative purposes in sewing and crafting. Their unique design allows them to be securely attached to fabric while offering a raised profile that enhances the visual appeal of garments and accessories. If you're ready to tackle the process of installing these buttons, follow this step-by-step guide for a hassle-free experience.
The first step in installing metal shank buttons is gathering all necessary tools and materials. Here's what you'll need:
Before you begin stitching, it’s crucial to position the button properly. Here are some tips for accurate placement:
Once you’ve finalized the button's position, you’re ready to start the installation process.
Before you start attaching the button, ensure your fabric is properly prepared:
With your fabric ready, it’s time to begin sewing the button in place.
Now that you have your button positioned and fabric prepared, follow these steps to sew it on:
After sewing the button in place, your installation is nearly complete. Here are a couple of final steps:
Congratulations! You’ve successfully installed a metal shank button. With patience and attention to detail, you'll achieve a secure and aesthetically pleasing finish that enhances your project. Happy sewing!
Installing metal shank buttons can be a rewarding task, giving your garments a polished and professional look. However, like any DIY project, there are common pitfalls that can lead to frustration or subpar results. In this section, we’ll explore some of the most common mistakes to avoid when installing metal shank buttons, ensuring your project turns out perfectly.
One of the fundamental aspects of successfully installing metal shank buttons is using the appropriate tools. Many crafters make the mistake of using tools that aren’t suited for the job, leading to ineffective installation. Here are some essential tools you should always have on hand:
Using the wrong needles or thread can result in damaged fabric or loose buttons, which can be easily avoided with the right tools.
Another common mistake is not marking where to place the buttons before sewing them on. This can lead to uneven spacing, making your garment look unprofessional. To avoid this issue:
Taking the time to plan your layout will save you from having to remove poorly placed buttons later.
Each fabric behaves differently, and failing to consider this can lead to problems when installing metal shank buttons. Here’s what you should keep in mind:
Being mindful of your fabric type helps prevent mishaps and ensures that the button remains securely attached.
Button orientation is also crucial when installing metal shank buttons. Some people forget that the shank should be oriented to allow the button to lay flat against the fabric. To avoid this mistake:
This attention to detail will not only enhance the appearance but also ensure functionality!
Finally, once you’ve installed your metal shank buttons, it’s vital not to overlook a final quality check. A common mistake is assuming everything is perfect without testing the buttons. To ensure they are securely attached:
Taking this extra step can prevent last-minute disasters that might compromise your hard work.
By avoiding these common mistakes, you can streamline the process of installing metal shank buttons, resulting in a clean, precise, and professional finish. Happy sewing!